Search This Blog

07 July 2010

Support Software for Printer iRC1028


If you are using printer/copy machine Canon iRC1028 and you don't have software driver for the printer/copy machine here is my support link for you. Hope you can solve your problem with your printer/copy machine.
  1. Software Driver: UFR II Printer Driver V20.55 for Windows XP/Server 2003/Vista/Server 2008/Windows 7 x64 Edition available here http://support-asia.canon-asia.com/contents/ASIA/EN/0100262201.html
  2. Software Driver: UFR II Printer Driver V20.55 for Windows 2000/XP/Server 2003/Vista/Server 2008/Windows 7 available here http://support-asia.canon-asia.com/contents/ASIA/EN/0100262101.html
  3. Postscript 3 printer driver: PostScript 3 Printer Driver V20.55 for Windows XP/Server 2003/Vista/Server 2008/Windows 7 x64 Edition available here http://support-asia.canon-asia.com/contents/ASIA/EN/0100263201.html
  4. PDF files V3.10 For Windows available here http://support-asia.canon-asia.com/contents/ASIA/EN/0100266801.html
     
  5. PPD files V3.10 for Mac OS X 10.3/10.4/10.5/10.6 available here http://support-asia.canon-asia.com/contents/ASIA/EN/0100263201.html 

06 June 2010

Filtering MAC Address to Allow connection to DWL-G700AP

To improve security on your Local Area Network when you are using Wireless Access point of DWL-G700AP is by turning on MAC address filter feature.
To do so just log in to your DWL-G700AP wireless access point and then go to Advanched Tab. In Advanched Tab page click on Filter button.

There are 3 option in filtering Mac address feature:
  1. Disable Mac address filter
  2. Only allow MAC address(es) listed below to connect to DWL-G700AP
  3. Only deny MAC address(es) listed below to connect to DWL-G700AP

The first option is to allow all MAC address to connect to wireless access point.

The second option is to allow only listed MAC address to connect to wireless access point.

The third option is to dissallow listed MAC address to connect to wireless access point.

To activate Mac address filtering feature you have to click on the second or third option and then click apply button.

For the second and third option you have to add Mac address to the list by typing MAC address in the box of MAC address and clicking apply button. MAC address will be available in the MAC Filter List table.

05 June 2010

Installing Canon iRC3100N

To install printer/fax/copy machine and scanner of Canon IRC3100N driver do the following steps:
  1. Download driver software here: http://support-asia.canon-asia.com/contents/ASIA/EN/0100251501.html
  2. Extract downloaded file.
  3. Run Setup.exe file on extracted folder.


  4. Click Next button on PS3 Printer Driver - Setup Wizard Ver. 5.00.
  5. Click Yes button on License agreement screen.
  6. There are 3 choice:
    a. Manually Set Port To Install.
    b. Search for Network Printer to Install.
    c. Install with USB connection.
    Depending on how your printer connected to your machine you have to choose correct one. In this scenario I consider the printer is connected to LAN.


  7. Because in this scenario the printer is connected using LAN so I chose Search for Network Printer to Install and then click Next button.
  8. Activate Canon Driver Information Assist Service to Department ID management to the computer. Click on Next button.
  9. Installation will search for available printer on your network.


  10. If the printer is founded the list of printer will be available on printer list.
  11. Select the printer and click on Add button and click Next.
  12. Click Start to install the printer driver on your computer.
  13. Click Yes to conform installation process.

04 June 2010

D-Link DPR-1061 printer port

Print server D-Link DPR-1061 consist of 3 printer port, 2 prot USB and 1 port LPT. You can find out whether the printer is active on the printer server by opening the web console of the printer server.


After login to web console you are directly navigate to the main page of printer server home page. In this page you can see the status of all printer port. If the printer is connected to print server and the printer is on the status will be on line and if not the status is off line.

03 June 2010

Xerox Phaser 3435 PS Special Features

Xerox Phaser 3435 PS is equipped with several special features that improve the print quality.

You can:
  1. Print with excellent quality and high speed
    • You can print up to 1200 x 1200 dpi effective output.
    • Your printer prints A4-sized paper at up to 33 ppma
  2. Handle paper flexibly
    • multi-purpose tray supports letterheads, envelopes, labels, transparencies, custom-sized materials, postcards, and heavy paper. multipurpose tray holds up to 50 sheets of plain paper.
    • 250-sheet tray 1 and 250-sheet optional tray 2 support plain paper in various sizes.
    • Multiple output tray; select either the output tray (face-down) or the rear cover (face-up) for the most convenient access.
    • Straight-through paper path capability from multi-purpose tray to the rear cover.
  3. Create professional documents
    • Print Watermarks. You can customize your documents with words, such as “Confidential”.
    • Print Booklets. This feature enables you to easily print a document to create a book. Once printed, all you have to do is fold and staple the pages.
    • Print Posters. The text and pictures of each page of your document are magnified and printed across the sheet of paper and can then be taped together to form a poster.
  4. Save time and money
    • You can print on both sides of the paper to save paper (Double-sided printing).
    • You can print multiple pages on a single sheet of paper to save paper (2-Up printing).
    • You can use preprinted forms and letterhead with plain paper. See the Software section.
    • This printer automatically conserves electricity by substantially reducing power consumption when not in use.
  5. Expand the printer capacity
    • The Phaser 3435 series have 64 MB of memory which can be expanded to 320 MB.
    • A Network interface enables network printing.
    • A PostScript 3 Emulation* (PS) enables PS printing.


02 June 2010

Stop email session on MDaemon

If you have MDaemon server on your computer server, maybe you need to know and monitor the current activity of MDaemon mail server.

How to monitor current sending and receiving process on MDaemon, follow these steps:
  1. Open Mdaemon application, GUI interface of MDaemon application will display.
  2. Click on Session tab on the bottom right of GUI interface of MDaemon.
  3. Klik on All Session tab on the upper left of second tab.
  4. On the main screen of MDaemon GUI interface you will see active session of MDaemon send and receive activity
On the left of active session screen there are arrows:
  • Right arrow with red color indicating SMTP receiving process
  • Left arrow with red color indicating SMTP sending process
  • Right arrow with green color indicating POP downloading process

If there is activity you want to stop for example user send email message with big size attachment you can stop the session. To stop email session right click on the session you want to stop and click on Disconnect menu on drop down menu.

01 June 2010

Installing Canon iR C2550

How to install printer driver Canon iR C2550?
To install printer driver of Canon iR C2550 do the following steps:
  1. Download driver from here http://support-asia.canon-asia.com/contents/ASIA/EN/0100109101.html.
  2. Extract exe file by double click the file you've downloaded.
  3. Go to extract folder and double click setup.exe file.


  4. Klick Next on Welcome screen.
  5. Klick Yes on Licence Agreement Screen.

  6. Select Search for Network Printer to install and klick Next button on Select printer Installation Screen.
  7. Select Add printer and klick Next button on Select Process Screen (Setup will search available network printer on your network and will display them).
  8. Select the ip address of the printer you want to install and klick Add button and then click next button.
  9. Klik Start on Confirm the setting screen.
  10. Klik Yes on message box to install driver.

08 May 2010

NP600 Portable Projector Troubleshooting

If there is no picture, or the picture is not displayed correctly.
  • Power on process for the projector and the PC.

    Be sure to connect the projector and notebook PC while the projector is in standby mode and before turning on the power to the notebook PC. In most cases the output signal from the notebook PC is not turned on unless connected to the projector before being powered up.
    NOTE: You can check the horizontal frequency of the current signal in the projector’s menu under Information. If it reads “0kHz”, this means there is no signal being output from the computer.

  • Enabling the computer’s external display.

    Displaying an image on the notebook PC’s screen does not necessarily mean it outputs a signal to the projector. When using a PC compatible laptop, a combination of function keys will enable/disable the external display. Usually, the combination of the ‘Fn” key along with one of the 12 function keys gets the exter nal display to come on or off. For example, NEC laptops use Fn + F3, while Dell laptops use Fn + F8 key combinations to toggle through external display selections.

  • Non-standard signal output from the computer
    If the output signal from a notebook PC is not an industr y standard, the projected image may not be displayed correctly. Should this happen, deactivate the notebook PC’s LCD screen when the projector display is in use. Each notebook PC has a different way of deactivate/reactivate the local LCD screens as described in the previous step. Refer to your computer’s documentation for detailed information.

  • Image displayed is incorrect when using a Macintosh

    When using a Macintosh with the projector, set the DIPswitch of the Mac adapter (not supplied with the projector) according to your resolution. After setting, restar t your Macintosh for the changes to take affect. For setting display modes other than those suppor ted by your Macintosh and the projector, changing the DIP switch on a Mac adapter may bounce an image slightly or may display nothing. Should this happen, set the DIP switch to the 13” fixed mode and then restart your Macintosh. After that, restore the DIP switches to a displayable mode and then restart the Macintosh again.
    NOTE: A Video Adapter cable manufactured by Apple Computer is needed for a PowerBook which does not have a mini D-Sub 15-pin connector.

  • Mirroring on a PowerBook

    * When using the projector with a Macintosh PowerBook, output may not be set to 1024 x 768 unless “mirroring” is off on your PowerBook. Refer to owner’s manual supplied with your Macintosh computer for mirroring.

  • Folders or icons are hidden on the Macintosh screen

    Folders or icons may not be seen on the screen. Should this happen, select [View] -> [Arrange] from the Apple menu and arrange icons.

07 May 2010

Over-Temperature Protection NP600 Portable Projector

If the temperature inside the projector rises too high, the over-temperature protector will automatically turn off the lamp with the STATUS indicator blinking (2-cycle On and Off.)

Should this happen, do the following:
  • Unplug the power cable after the cooling fans stop.
  • Move the projector to a cooler location if the room where you are presenting is par ticularly too war m.
  • Clean the ventilation holes if they are clogged with dust.
  • Wait about 60 minutes until the inside of the projector becomes cool enough.

06 May 2010

Replacing the Lamp of NP600 Portable Projector

When the lamp reaches the end of its life, the LAMP indicator in the cabinet will blink red. Even though the lamp may still be working, replace the lamp to maintain the optimal projector performance. After replacing the lamp, be sure to clear the lamp hour meter.

CAUTION
  • DO NOT TOUCH THE LAMP immediately after it has been used. It will be extremely hot. Turn the projector off, wait 30 seconds, turn off the main power switch and then disconnect the power cable. Allow at least one hour for the lamp to cool before handling.
  • DO NOT REMOVE ANY SCREWS except one lamp cover screw and two lamp housing screws. You could receive an electric shock.
  • Do not break the glass on the lamp housing.
    Keep finger prints off the glass surface on the lamp housing. Leaving finger prints on the glass surface might cause an unwanted shadow and poor picture quality.
  • The projector will turn off and go into standby mode when you continue to use the projector for another 100 hours after the lamp has reached the end of its life. If this happens, be sure to replace the lamp. If you continue to use the lamp after the lamp reaches the end of its life, the lamp bulb may shatter, and pieces of glass may be scattered in the lamp case. Do not touch them as the pieces of glass may cause injury. If this happens, contact your NEC dealer for lamp replacement.
*NOTE: This message will be displayed under the following conditions:
  • for one minute after the projector has been powered on
  • when the (POWER) button on the projector cabinet or the POWER OFF button on the remote control is pressed
To turn off the message, press any button on the projector cabinet or the remote control.

To replace the lamp:
Optional lamp and tools needed for replacement:
  • Replacement lamp NP07LP
  1. Remove the lamp cover.
    (1) Loosen the lamp cover screw
    • The lamp cover screw is not removable.
    (2) Push and slide the lamp cover off.
  2. Remove the lamp housing.
    (1) Loosen the two screws secur ing the lamp housing until the phillips screwdriver goes into a freewheeling condition.
    • The two screws are not removable.
    • There is an interlock on this case to prevent the risk of electrical shock. Do not attempt to circumvent this interlock.
    (2) Remove the lamp housing by holding it. CAUTION: Make sure that the lamp housing is cool enough to before removing it
  3. Install a new lamp housing.
    (1) Insert a new lamp housing until the lamp housing is plugged into the socket.
    CAUTION Do not use a lamp other than the NEC replacement lamp NP07LP. Order this from your NEC dealer.
    (2) Push the top center of the lamp housing to secure it.
    (3) Secure it in place with the two screws.
    • Be sure to tighten the screws.
  4. Reattach the lamp cover.
    (1) Slide the lamp cover back until it snaps into place.
    (2) Tighten the screw to secure the lamp cover.
    • Be sure to tighten the screw.
  5. Connect the supplied power cable, turn on the Main Power switch and turn on the projector.
  6. Finally, select the menu -> [RESET] -> [CLEAR LAMP HOURS] to reset the lamp usage hours.
NOTE: When you continue to use the projector for another 100 hours after the lamp has reached the end of its life, the projector cannot turn on and the menu is not displayed.
If this happens, press the HELP button on the remote control for 10 seconds to reset the lamp clock back to zero.
When the lamp time clock is reset to zero, the LAMP indicator goes out.


05 May 2010

Cleaning the Cabinet and the Lens NP600 Portable Projector

To Clean the Cabinet and the Lens of NP600 Portable Projector, do the following steps:
  1. Turn off the projector before cleaning.
  2. Clean the cabinet periodically with a damp cloth. If heavily soiled, use a mild detergent. Never use strong detergents or solvents such as alcohol or thinner.
  3. Use a blower or lens paper to clean the lens, and be careful not to scratch or mar the lens

04 May 2010

Cleaning or Replacing the Filters NP600 Portable Projector

The air-filter sponge keeps dust and dirt from getting inside the projector and should be frequently cleaned. If the filter is dirty or clogged, your projector may overheat.

NOTE: The message for filter cleaning will be displayed for one minute after the projector is turned on or off. To cancel the message, press any button on the projector cabinet or the remote control.

CAUTION
  • Turn off the projector, turn off the main power switch and unplug the projector before replacing the filters.
  • Only clean the outside of the filter cover with a vacuum cleaner.
  • Do not attempt to operate the projector without the filter cover.


To clean the a_r-filter:
Vacuum the filter-through the filter cover.

To replace the filter (sponge):
  1. Remove the filter cover (2 locations) by pushing up on the catch of the cover until you feel it detach.
  2. Replace two filters.
    (1) Gently peel off the filter (sponge) and clean the filter cover.
    (2) Attach the new filter to the filter cover.
  3. Reinstall the new filter cover (2 locations).• Inser t the filter cover until you feel click.
  4. Clear the filter hours used.
To reset the filter usage time, from the menu, select [RESET] -> [CLEAR FILTER HOURS].

NOTE: Do not wash the filter with soap and water. Soap and water will damage the filter membrane. Before replacing the filter, remove dust and dirt from the projector cabinet. Keep out dust and dirt during filter replacement.

NOTE: When you replace the lamp, it is also wise to replace the filter. The filter comes in the same package with your replacement lamp.

03 May 2010

Print Job Log on Canon iR C3080

If you have problem printing document to Canon iR C3080 you should monitor the print job log to analyze the problem.

To see print job log do the following steps:
  1. Open your browser and navigate to the printer IP address. The Remote UI of the printer will display.
  2. Click on Job Status on the left side of Remote UI. You will ask for user name and password. Enter admin user and password for the printer.
  3. Sub menu of the Job Status will display.
  4. Click on Log link under Print Job to display the printer job log.
  5. In the table of Print Job log you can see there are 11 column:
    • Job number. ID number of print process generate by the printer as autonumber field.
    • Result. Result process Success or not.
    • Document Name. The document file name of the print job.
    • User. User who print the print job.
    • Dept ID. ID of the user when print the print job.
    • Start Time. Beginning time of print process.
    • End Time. Endin time of print process.
    • Original Pages. How many pages the documents will be printed.
    • Output Pages. How many pages the documents succesfully printed.
    • Sheet x copies. How many copies the documents printed.
    • End Code. End of print code.

02 May 2010

Setting Auto Respond on MDaemon

If you out of the office for a long time and you want to set auto respond mail to your colleague who sent you email you can set it on MDaemon server.

To set Auto Respond from Mdaemon Server do the following steps:
  1. Open MDaemon Server.
  2. Go to Account > Account Manager menu (or you can use Alt-M) to view Account Manager window.
  3. Choose mail user you want to set.
  4. Click on Edit button, the Account Editor for the user will show.
  5. Click on Auto Resp Tab.

  6. Activate Enable an auto responder for this account check box.
  7. Set schedule for auto responder by clicking on schedule button.
  8. klick browse and choose message on text file for content in auto responder email.
This setting only can be apply by mail server administrator. If you want your mail user set this auto responder by their own you can set Account can modify its own settings via WebAdmin.

01 May 2010

Showing anda Hiding MDaemon toolbars

Sometime you can not use toolbars on MDaemon server because they are accidently hidden. I've often experienced of this. If toolbars on MDaemon server didn't show you can show it by doing this steps.
  1. Open MDaemon.
  2. Go to Windows > Reset Toolbars menu.
  3. All MDaemon toolbars will show under Menu Bar.
  4. To arrange toolbars drag and drop each toolbars you want to arranga.

To Hide Toolbar on MDaemon do the following steps
  1. Righ click on toolbars area.


  2. You will see popup menu with 4 choice : 0-Domain and Users, 1-Popular items, 2-Security, 3-Queues and Help.
  3. Uncheck item toolbar you want to hide.

06 April 2010

Warning mail.mydomain.com: CASE update unsuccessful. This may be due to transient network

Today I receive email from Ironport C160

Here is the message:

Subject: Warning mail.mydomain.com: CASE update unsuccessful. This may be due to transient network

The Warning message is:

CASE update unsuccessful. This may be due to transient network or DNS issues, HTTP proxy configuration causing update transmission errors or unavailability of the configured download server. The specific error on the appliance for this failure is: Error transferring CASE update directory information 'http://downloads.ironport.com/as/case.ini': I/O error opening URL 'http://downloads.ironport.com/as/case.ini?version=7.1.1-012&model=C160&serial=A4BADBDF7264-CNQH5M1&t_version=3.0.0-031&e_version=3.0.0-031&has_vof=0&has_ipas=1&has_sbnp=1'

Version: 7.1.1-012
Serial Number: XXXXXXXXX-CNQH5M1
Timestamp: 10 Dec 2010 07:58:55 +0700

To learn more about alerts, please visit our Knowledge Base. In many
cases, you can find further information about this specific alert. Please
click the Knowledge Base link after logging into our Support Portal at:

https://supportportal.ironport.com/irppcnctr/srvcd?u=http://secure-support.soma.ironport.com/products/&sid=900002

If you desire further information, please contact your support provider.

To open a support request for this issue, access the IronPort C160
and issue the "supportrequest" command. The command sends an email with
diagnostic information directly to your IronPort support provider to
facilitate a rapid diagnosis of the problem.

Thank you.


This occurs because the connection from Ironport to download source is disconnected. If this happens to Ironport you should check your internet connection.

05 April 2010

Spam Sample Detected on Ironport

Here is the sample of message tracking on Ironport. This sample show you message detected as spam.

23 Nov 2010 14:45:43 (GMT +07:00) Protocol SMTP interface Data 2 (IP x.x.x.x) on incoming connection (ICID 553215) from sender IP 202.72.55.143. Reverse DNS host rmail1016c.rakuten.co.jp verified yes.

23 Nov 2010 14:45:43 (GMT +07:00) (ICID 553215) ACCEPT sender group UNKNOWNLIST match sbrs[-1.0:10.0] SBRS 0.0

23 Nov 2010 14:45:43 (GMT +07:00) Start message 99994 on incoming connection (ICID 553215).

23 Nov 2010 14:45:43 (GMT +07:00) Message 99994 enqueued on incoming connection (ICID 553215) from 224379@rmailmf.rakuten.co.jp.

23 Nov 2010 14:45:44 (GMT +07:00) Message 99994 on incoming connection (ICID 553215) added recipient (user@domain.com).

23 Nov 2010 14:45:45 (GMT +07:00) Message 99994 contains message ID header 20101123074537.8b0ef2fe849@rmail110c.rakuten.co.jp.

23 Nov 2010 14:45:45 (GMT +07:00) Message 99994 original subject on injection: 【号外】|メルマガ会員限定|割 \r\n 引率UP♪●セレカジざっくりニット素 \r\n 材タートルネックワンピやリンジーロー \r\n ハンご愛用ワンピも

23 Nov 2010 14:45:45 (GMT +07:00) Message 99994 (43449 bytes) from 224379@rmailmf.rakuten.co.jp ready.

23 Nov 2010 14:45:45 (GMT +07:00) Message 99994 matched per-recipient policy DEFAULT for inbound mail policies.

23 Nov 2010 14:45:45 (GMT +07:00) Message 99994 scanned by Anti-Spam engine: CASE. Interim verdict: Positive

23 Nov 2010 14:45:45 (GMT +07:00) Message 99994 scanned by Anti-Spam engine: CASE. Final verdict: Positive

23 Nov 2010 14:45:46 (GMT +07:00) Message 99994 quarantined to Policy. Content filter my_policy.

04 April 2010

Tracking message on Ironport C160

If you have email problem and you need to track message on ironport C160 do the following steps:

1. Login to Ironport Web Console using authenticated user
2. Go to Monitor > Message Tracking.
3. Massage tracking page will display. In this page you can fill any necessary text to perform filter process on how message tracking you want to display.
4. Fill in text box Envelope Sender with appropriate condition (Is, Begin With or Contains)
5. Fill in text box Envelope Recipient with appropriate condition (Is, Begin With or Contains)
6. Fill in text box Subject with appropriate condition (Is, Begin With, Contains, or Is Empty)
7. Define range of time the message is received: Last day, Last Week or Custom Range.
8. Click on Search Button to view the log result depend on your filter setting

03 April 2010

Decreasing the memory usage of OfficeScan client on a terminal server

Problem:
A terminal server hosts multiple user sessions at once and OfficeScan starts up the client GUI for each session.

Use this solution to modify the default settings so that the OfficeScan client GUI does not start up for every session, which in turn can help save system memory.

Please do the following:

1. Log on to the OfficeScan management console.
2. Go to Networked Computers > Client Management.
3. Select the OfficeScan client and then click to Settings > Privileges and Other Settings > Other Settings tab.
4. Under Client Console Access Restriction, select the Do not allow users to access the client console from the system tray or Windows Start menu check box.
5. Click Apply to All Clients.

By setting this restriction, your users will not be able to access the client console from the system tray or Windows Start menu. OfficeScan will run in the background and will continue to provide protection from security risks. This setting will also save you 6.5 to 7 MB of memory for each session in the terminal server.

02 April 2010

Checking Quarantine Mail on IronPort

If you use Ironport C160 as a spam filter in your office, you have to check Quarantine mail is there any needed mail stop by Ironport. To check quarantine mail you log in to Ironport as administrator user and then go to menu Monitor > Quarantine page.

On the Quarantine page you can find out the number of emails that go into quarantine. There are 4 types of quarantine they are quarantine spam, outbreaks, policy and viruses.

1. Spam quarantine is an incoming email from the internet because it includes categories of spam. Ironport analyze each incoming email, and categorize it as spam if they meet certain conditions.

2. Outbreaks. The virus outbreak Filters engine compares incoming messages with rules published Virus outbreak filters. Messages that match rules are assigned a threat level and That threat level is compared to the threat level threshold you set. That meet or exceed Messages That threshold are quarantined.

3. Policy. You can set its own policy for the incoming emails to be quarantined. For example, an email coming into your domain with a user name that is no longer working in your office.

4. Viruses. Emails that contain viruses, of course, must be blocked not to enter a user inbox as it can endanger your data and network. In order for an email that contains a virus can always be quarantined of course you should always update your antivirus.

To find out details quarantined email data that you must click on the type of quarantine you want to see. Suppose you want to see the detail of policy data, then you cklik on policy. Immediately quarantine emails detailed data from the policy settings will be displayed as a table of data consisting of the recipient, sender, email subject, schedule an exit and the size of the email. To view the message body of each email you click on the subject field. So Ironport will display the contents of the message body of the email address you choose.

01 April 2010

Download video files from YouTube

Do you often watch videos from YouTube? If you find the video that you like and you want to download it into your computer, you need to use special software to download video files from YouTube.
There are plenty of software to download video files from YouTube of which I've tried is YouTube Downloader. You can download it for free at http://youtubedownload.altervista.org
Once you downloaded YouTube Downloader and install this software on your computer, run the YouTube Downloader applications.

  • In the text box "Enter the URL of the video You Want to download (e.g. http://youtube.com/watch?v=f5Jz8 ...)" fill in the URL link where the video will be downloaded.
  • By default the downloaded file will be saved in My Document. If you want to change click the Change button and browse to the new location that you want.
  • Click the Download button to start the download process.


    Wait until the progress bar is full and there is notice download completed.
    With this application you are also able to convert video files from one type of file to another video file type. Suppose you want to convert video file type MP4 to 3gp.

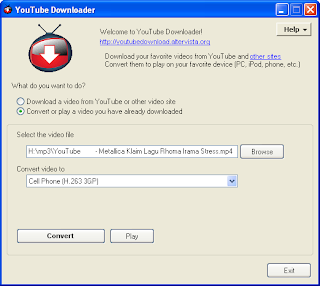
To convert a video file format you click on Convert or play a video you have already downloaded option. In the text box select the video type the name of the file to be converted. Later in the combox Convert Video To: choose a new video file types that you want. Click the Convert button to start the process of convert file.

08 March 2010

Installing UFR II Printer Driver for Canon IR C3080

To install printer driver of printer Canon iR C3080 you have prepare CD Driver of UFR II. In this installation process I assume the printer machine is connected to switch or hub in your Local Area Netwrok with IP address 192.168.0.215.

Follow this setp:

  1. Insert CD ROM UFR II
  2. Explore CD-Rom using Windows Explorer
  3. Double click file MInst.exe
  4. Installation Windows will open
  5. Click on Installation button
  6. Installation option windows will appear
  7. Select the option you need to install then click Install button
  8. Installation process will begin.
  9. Window UFR II Setup Wizard will open

  10. Click on Next button
  11. Window License Agreement will open
  12. Click on Yes button
  13. On the next screen choose Search for Network Printer to Install and check on check box Reactive Printers in the Sleep Mode and Search
  14. Click Next button
  15. On the next screen chose Add Printers and then click Next button
  16. Installation wizard will reactive printers and search all connected printer on tour Network.
  17. After finding connected printer you chose printer you want to install on you PC and click on Add button

  18. Click on Next button
  19. Installation will create port for new printer
  20. Click Start on next screen to begin installation proses
  21. Click Yes on warning dialog box
  22. Wait a moment while installation process in progress
  23. Depend on installation option you chose on step 6, the next screen is for installing Network Scan Gear
  24. Click on Next button to install Network ScanGear
  25. Click on Yes button to agree Licence Agreemen
  26. On next screen you can chose destination location, if you don’t want to change anything just click on the Next button
  27. On the next screen you can select program folder, if you don’t want to change anything just click on the Next button
  28. Click Next button on Start Copying files
  29. Installation process will begin just wait a moment.
  30. Installation is Finished click on Finish button.
  31. The next step is to install Color Network Scan Gear
  32. Click on Next button
  33. Click on Yes button to agree License Agreement
  34. Click Next
  35. Click Next
  36. Click Next
  37. Installation progress please wait a moment
  38. Click Finish button
  39. Click Next
  40. Click Restart button if you want to restart your computer.

07 March 2010

Canon IR C3080 UFR II

Canon IR C3080 UFR II is the multi function printer suitable for user with more than one user. This machine can receive and send fax using telephone line.

For PC users, this machine can be use as printer to print color or black and white document. This machine also can be use as a scanner that will scan document to PDF, JPG or TIFF file format. If you need to scan document with small size file you can scan to PDF file format with black and white format.

This printer can be connected to switch/hub in your Local Area Network. After IP address of this machine setup you can admin the machine via web browser by opening the IP address of the machine using internet Explorer or other browser.

The first page display on browser is the top page and this page show the status of the printer machine.

1. Device Basic Information
In this part you can see the Device Name and Product Name of the printer.
Device Name: iR C3080
Product Name: iR 3080

2. Basic Function Status
There are three basic function of iR C3080
  • Printer status: ready or not ready
  • Scanner status: ready or not ready
  • Fax status: ready or not ready
3. Language
There are 6 choice languages: Japanese, English, French, Italian, German and Spanish.

06 March 2010

Activating Spam Filter on MDaemon Mail Server 9

MDaemon mail server support filtering spam process to block spam mail from internet. You can configure to enable or disable this setting.

To enable or disable spam filter process in MDaemon mail server follow these steps:
  1. Open MDaemon window application
  2. On the left side of MDaemon desktop application expand the sub tree servers.
  3. In the sub tree AntiSpam you can see status of AntiSpam; inactive or active
  4. Right click on sub tree AntiSpam and choose Toggle active/inactive to switch MDaemon spam filter enable and disable.

For the additional setup of Spam Filter you can go to Security > Spam Filter menu.
In the Spam Filter window you can setup processing to spam mail weather you would like to delete, bounce the message to the sender, put the message in the spam trap public folder or flag it but let it continue down delivery.

If you enable spam filter you can still make exclusion for some email address or part of email address or domain name. To do this you can go to Exclusion List and type the address you want to exclude by spam filtering process. Click Apply button to save and activate the changes you made.

05 March 2010

Change IP Address D-Link DWL-G700AP

How to Change IP Address of D-Link DWL-G700AP?

To change IP Address of D-Link DWL-G700AP Access point follows these steps:

  1. Login to your D-Link DWL-G700AP using Admin user.
  2. In Home page, click on LAN button.
  3. If your D-Link DWL-G700AP Access Point using Dynamic IP Address switch it into Static IP Address.
  4. Fill in IP Address you want to set up in your Access point. This IP address must be in the same class with your Local Area Network. For example if your network is 192.168.0.0/255.255.255.0 then the IP address must be in range of 192.168.0.1 to 192.168.0.254.
  5. Fill in appropriate subnet mask, gateway and DNS server for your LAN.
  6. Click on Apply button to save the new setup.

03 March 2010

Filtering computer to connect to DWL-G700

To improve security in your LAN, if you are using D-Link DWL-G700AP AirPlus G you can specify which computer or devices allow or deny connecting to your Access Point.

To do this setup you have to login to your D-Link DWL-G700AP using Admin user and then go to Advanced page, and then click on Filters button.

There are 3 options in this page:

1. Disabled MAC Filters.

This option means you allow all connection from any computers or devices.

2. Only allow MAC address(es) listed below to connect to DWL-G700AP.

This option means you only allow specified MAC address. After activating this option you have to entry MAC address of computers or other devices to be allowed to connect to this Access Point.


3. Only deny MAC address(es) listed below to connect to DWL-G700AP.

This option means you deny specified MAC address. After activating this option you have to entry MAC address of computers or other devices to be denied to connect to this Access Point.

After changing the options you have to click on Apply button to save the changes you have made. The D-Link will restart to apply the new setting for your access point.

01 March 2010

Installing Ironport C160

Since the number of incoming spam messages to a user in our office, we decided to use a special anti-spam, because the existing anti-spam on Mdaemon not able to detect and block incoming spam.

Ironport C160 becomes our choice as the anti-spam that is used. The installation process is assisted by technical support from the supplier that is Metrodata. It did not take long to install Ironport in our office. On the first day of Staff Metrodata install Ironport while the second day of transferring basic knowledge of how to monitor email tracking, especially email messages coming into our office and how to create a rule-Content filters for additional rules that can be customized by our own.

The result is very good spam filter; almost all spam can be blocked so that spam emails do not enter to user inbox. All spam is quarantined by the Ironport for backup if there are occasional important emails is required that is not spam but blocked by the Ironport.

I tried making my own artificial filter content. Content filter that I made was to block and quarantine incoming email from yahoogroups mailing list for employees who have not worked in our office. Employees who are out are not doing unsubscribe to the mailing list so that email from yahoogroups still sent to the user.

Benefits of using Ironport:
  1. Nearly 100% of the spam emails were blocked so that spam does not enter to user inbox.
  2. Reduce spam email traffic so that bandwidth LAN traffic decreased due to spam.
  3. Users to work more effectively because it does not deal with spam.
  4. User's Inbox folder is more efficient because it does not store spam.
  5. Web interface for monitoring emails on the Ironport is very easy to use.
  6. There are charts that facilitate monitoring of email receipt.
  7. Message tracking was recorded in the log is complete.

21 February 2010

Error maildrop already locked

Email user in my office complaint because she could not download email from MDaemon server. Error message in outlook is:
Task '192.168.0.25 - Sending and Receiving' reported error (0x800CCC92) : 'Your e-mail server rejected your login. Verify your user name and password in your account properties. Under Tools, click E-mail accounts. The server responded: -ERR access denied'
After changing user password end retry to send and receive again this error is still occur. And then I check log mail POP in MDaemon server. The log status is fail with this error message in log file:
Thu 2010-07-01 08:11:17: Session 1437; child 4
Thu 2010-07-01 08:11:15: Accepting POP connection from [172.19.5.31 : 1062]
Thu 2010-07-01 08:11:15: --> +OK mydomain.com POP MDaemon 9.0.6 ready
Thu 2010-07-01 08:11:16: <-- USER john Thu 2010-07-01 08:11:16: --> +OK john... User ok
Thu 2010-07-01 08:11:17: <-- PASS ****** Thu 2010-07-01 08:11:17: --> -ERR maildrop already locked
Thu 2010-07-01 08:11:17: POP session terminated, (Bytes in/out: 20/145)
Then I check the mail box of the user and I found there are more than 10 emails in user mail box. One of the email sizes is more than 8MB. I tried to delete this email but I could not delete because the email file was locked. To delete this email I must restart MDaemon server first.

11 February 2010

Mail Rejected by Keyword

I received complaint from user that her mail was rejected by the receiver mail server.

The massages from mail server are:

Subject: Undelivered Mail Returned to Sender
This is the mail system at host mxwcom.263xmail.com.
I'm sorry to have to inform you that your message could not be delivered to one or more recipients. It's attached below.
For further assistance, please send mail to postmaster.
If you do so, please include this problem report.
You can delete your own text from the attached returned message.
The mail system
: host mxcom.263xmail.com[211.150.64.38] said:
mail rejected by keyword (in reply to end of DATA command)

Referring to that message I conclude that the content of email from the user contain keyword that is usually use by spam email. Then I checked the content of email and I found keyword "offering price" in the message.

I asked to the user to change keyword "offering price" in her email and resend the email to the recipient.

After changing "offering price" words with "quotation" and resending the email, then the email was sent successfully and no rejection from recipient email server.

01 February 2010

Email sending error because of too many connections

There were many reason of email sending error. One of them is because of too many connections to the server. This is the sample MDaemon email server logs of sending mail failure because of too many connections to the mail server.

Sender user is: user@mycompany.com
Recipient user is: theuser@telkom.net

In this log there is line:
Fri 2010-03-12 07:41:33: <-- 421 #4.4.5 Too many connections to this host Fri 2010-03-12 07:41:33: --> QUIT
Fri 2010-03-12 07:41:33: Socket connection closed by the other side (how rude!)


This mean the recipient mail server could not receive email from user@mycompany.com because in the same time the server receipt too many connection (may be from other email server) that could not be handled.

MDaemon server (Sender user mail server) will automatically resend the mail from user@mycompany.com to theuser@telkom.net next time depend on the setting of MDaemon mail server.

Fri 2010-03-12 07:41:33: Session 8894; child 10
Fri 2010-03-12 07:41:31: Parsing Message
Fri 2010-03-12 07:41:31: From: user@mycompany.com
Fri 2010-03-12 07:41:31: To: theuser@telkom.net
Fri 2010-03-12 07:41:31: Subject: Kelebihan Pengobatan
Fri 2010-03-12 07:41:31: Message-ID:
Fri 2010-03-12 07:41:31: MX-record resolution of [telkom.net] in progress (DNS Server: 202.152.0.2)...
Fri 2010-03-12 07:41:31: * P=011 S=000 D=telkom.net TTL=(0) MX=[mx2.mail.plasa.com] {222.124.18.72}
Fri 2010-03-12 07:41:31: * P=011 S=001 D=telkom.net TTL=(0) MX=[mx1.mail.plasa.com] {222.124.18.71}
Fri 2010-03-12 07:41:31: Attempting MX: P=011 S=000 D=telkom.net TTL=(0) MX=[mx2.mail.plasa.com] {222.124.18.72}
Fri 2010-03-12 07:41:31: Attempting SMTP connection to [222.124.18.72 : 25]
Fri 2010-03-12 07:41:31: Waiting for connection...
Fri 2010-03-12 07:41:32: Connection established (192.168.0.25 : 2790 -> 222.124.18.72 : 25)
Fri 2010-03-12 07:41:32: Waiting for protocol initiation...
Fri 2010-03-12 07:41:32: <-- 421 #4.4.5 Too many connections to this host. Fri 2010-03-12 07:41:32: --> QUIT
Fri 2010-03-12 07:41:32: Attempting MX: P=011 S=001 D=telkom.net TTL=(0) MX=[mx1.mail.plasa.com] {222.124.18.71}
Fri 2010-03-12 07:41:32: Attempting SMTP connection to [222.124.18.71 : 25]
Fri 2010-03-12 07:41:32: Waiting for connection...
Fri 2010-03-12 07:41:32: Connection established (192.168.0.25 : 2798 -> 222.124.18.71 : 25)
Fri 2010-03-12 07:41:32: Waiting for protocol initiation...
Fri 2010-03-12 07:41:33: <-- 421 #4.4.5 Too many connections to this host. Fri 2010-03-12 07:41:33: --> QUIT
Fri 2010-03-12 07:41:33: Socket connection closed by the other side (how rude!)
Fri 2010-03-12 07:41:33: This message is 1 days old; it has 4 days left to get delivered
Fri 2010-03-12 07:41:33: SMTP session terminated (Bytes in/out: 94/12)

13 January 2010

Installing TCP/IP Printer for Windows XP

To Install TCP/IP Printer for Windows XP follow this steps:
  1. Go to Start -> Printers and Faxes, klick Add a Printer.


    Click Next on Add Printer Wizard first screen
  2. Select the first option, Local printer attached to this computer, and click Next.


  3. Select the second option, Create a new port, and highlight Standard TCP/IP Port
    from the pull-down menu. Click Next.


  4. Click Next button on Add Standard TCP/IP Printer Port Wizard screen


  5. Type the IP address of the MFP server (e.g. 10.62.31.15 used in this manual), which
    can be referred from the PRINTER SERVER STATUS of the MFP server’s Web
    configuration, and then the Port Name will automatically be filled in. Click Next


  6. Select Custom and click Settings.


    Then the follow screen will shows up, select LPR from the Protocol field. Then enter the Queue Name, which can be referred from PRINTER STATUS of the MFP server’s Web configuration, in the LPR Settings field. Click OK.


  7. Click Next.
  8. Click Finish.
  9. Highlight the printer, as shown. If the desired printer is not on the list, click Have Disk and insert the printer driver disk that came with your printer to install the printer drivers. Click Next


  10. At this screen, you can input a name for the printer, and then click Next Select Yes to print a test page, click Next.


  11. Click Finish. The printer is now ready for printing with Windows XP on your network.


12 January 2010

Email Notification on D-Link DRP-1061 Printer Server

If you need to notify when printer status change by email you can set this using web configuration.

On Web Configuratin page go to ADVANCED -> E-Mail Notification

Enable E-mail Notification
You can set the print server to send an alert message when the printer status changes through E-mail. To enable this function, set the Enable e-mail notification option to Yes. Then, input the administrator's E-mail address in the Destination e-mail Address field.

E-mail Account Details
You can assign an E-mail address to the print server, so that your mail of the account can be printed out directly through the printer (ASCII text only). To enable this function, enter the E-mail account in the Print Server E-mail Address field. Then enter the server address, used to receive your E-mail here, in the Incoming E-mail (POP3) Server Address field. For outgoing E-mail (SMTP) Server Address field, enter the server address that is used to send your E-mail here. If your mail server needs to verify the user when sending E-mail, Print Server will apply the E-mail Account (POP3) Name and E-mail Account (POP3) Password to
the mail server.

E-mail Printing
This section is for you to do E-mail Printing configuration, including:
E-mail Printing (ASCII Text Only): Allows you to enable or disable the E-mail printing. Check E-mail Interval: Allow you to set up a time interval in minute in order to check/receive E-mail periodically. After done the configuration, click Apply Settings to restore the new configuration, or Cancel to abandon.

11 January 2010

How to change Admin Password of D-Link DPR-1061

Launch the browser you have installed on your computer and direct it to the URL address: dlink-xxxxxx, where xxxxxx are the last six digits of DPR-1061’s MAC address. The MAC address can be found on the bottom side of the DPR-1061 device. Optionaly you can use IP Address of D-Link DPR-1061 in the URL address.


When you enter the correct URL, a password input dialog will pop up the following screen. Input “admin” in the User name field, and admin's password in the Password, and then click OK button.

Then the main screen of the MFP Server’s configuration will appear. In addition to the product information, you can access and control the MFP Server’s configuration through five links on the top of this main screen: Setup, Advanced, Maintenance, Status, and Help. You may click a desired link from the bar, to display its submenu and select a desired option listed in the left column, and then the corresponding content will show up in the center column.

To change Admin Password of D-Link DPR-1061 go to MAINTENANCE > Password

The Password screen allows you to change the password of the MFP server by entering the current password in Current Password field and new password in New Password and Confirm Password fields. After done the configuration, click Apply Settings to enable and restore the new password, or Cancel to abandon. Be aware that the default password of the MFP server is blank.

If you forgot your password you will not be able to open web configuration. To open web configuration you have to reset admin password of D-Link DPR-1061 to factory dafault password (blank password).

How to reset admin password to factory default?

You can reset admin password by Pressing and releasing Reset button to reset the MFP Server; or press and hold Reset button for three seconds until the USB1, USB2, and LPT LEDs on the front panel light up and then release the button, the MFP Server will resume the factory default settings.

Note: Reset button locate near LAN connection in rear panel.

10 January 2010

MDaemon Spam Filter system.

How spam filter works in MDaemon mail server system

1. MDaemon receipt mail from internet and then creates its files as tmp files
2. Massage was passed through Spam Filter and examine the content of email
3. Spam system will give score of content that suspected as spam content
4. If the score is more than setup score in MDaemon then the email will be refused

Here is the example of log SMTP process file generated by MDaemon Server.

Fri 2010-02-12 00:03:10: Session 1111; child 1; thread 4572
Fri 2010-02-12 00:03:09: Accepting SMTP connection from [192.168.0.27 : 3202]
Fri 2010-02-12 00:03:09: --> 220 mycompany.co.id ESMTP MDaemon 9.0.6; Fri, 12 Feb 2010 00:03:09 +0700
Fri 2010-02-12 00:03:09: <-- EHLO interscan
Fri 2010-02-12 00:03:09: --> 250-mycompany.co.id Hello interscan, pleased to meet you
Fri 2010-02-12 00:03:09: --> 250-ETRN
Fri 2010-02-12 00:03:09: --> 250-AUTH=LOGIN
Fri 2010-02-12 00:03:09: --> 250-AUTH LOGIN CRAM-MD5
Fri 2010-02-12 00:03:09: --> 250-8BITMIME
Fri 2010-02-12 00:03:09: --> 250 SIZE 0
Fri 2010-02-12 00:03:09: <-- MAIL FROM: SIZE=5889
Fri 2010-02-12 00:03:09: --> 250 , Sender ok
Fri 2010-02-12 00:03:09: <-- RCPT TO:
Fri 2010-02-12 00:03:09: Sender attempted to deliver message to unknown address
Fri 2010-02-12 00:03:09: --> 550 , Recipient unknown
Fri 2010-02-12 00:03:09: <-- RCPT TO:
Fri 2010-02-12 00:03:09: --> 250 , Recipient ok
Fri 2010-02-12 00:03:09: <-- RCPT TO:
Fri 2010-02-12 00:03:09: Sender attempted to deliver message to unknown address
Fri 2010-02-12 00:03:09: --> 550 , Recipient unknown
Fri 2010-02-12 00:03:09: <-- RCPT TO:
Fri 2010-02-12 00:03:09: --> 250 , Recipient ok
Fri 2010-02-12 00:03:09: <-- RCPT TO:
Fri 2010-02-12 00:03:09: --> 250 , Recipient ok
Fri 2010-02-12 00:03:09: <-- DATA
Fri 2010-02-12 00:03:09: Creating temp file (SMTP): c:\mdaemon\queues\temp\md50000008281.tmp
Fri 2010-02-12 00:03:09: --> 354 Enter mail, end with .
Fri 2010-02-12 00:03:09: Message size: 5889 bytes
Fri 2010-02-12 00:03:09: Passing message through Spam Filter (Size: 5889)...
Fri 2010-02-12 00:03:10: * 0.6 HTML_ATTR_UNIQUE BODY: HTML appears to have random attributes in
Fri 2010-02-12 00:03:10: * tags
Fri 2010-02-12 00:03:10: * 0.1 HTML_90_100 BODY: Message is 90% to 100% HTML
Fri 2010-02-12 00:03:10: * -4.7 BAYES_00 BODY: Bayesian spam probability is 0 to 1%
Fri 2010-02-12 00:03:10: * [score: 0.0000]
Fri 2010-02-12 00:03:10: * 0.0 HTML_MESSAGE BODY: HTML included in message
Fri 2010-02-12 00:03:10: * 4.0 URIBL_SBL Contains an URL listed in the SBL blocklist
Fri 2010-02-12 00:03:10: * [URIs: hilldid.com]
Fri 2010-02-12 00:03:10: * 8.0 URIBL_JP_SURBL Contains an URL listed in the JP SURBL blocklist
Fri 2010-02-12 00:03:10: * [URIs: hilldid.com]
Fri 2010-02-12 00:03:10: * 8.0 URIBL_AB_SURBL Contains an URL listed in the AB SURBL blocklist
Fri 2010-02-12 00:03:10: * [URIs: hilldid.com]
Fri 2010-02-12 00:03:10: * 3.0 URIBL_BLACK Contains a URL listed in the URIBL.com blacklist
Fri 2010-02-12 00:03:10: * [URIs: hilldid.com]
Fri 2010-02-12 00:03:10: * 9.0 URIBL_WS_SURBL Contains an URL listed in the WS SURBL blocklist
Fri 2010-02-12 00:03:10: * [URIs: hilldid.com]
Fri 2010-02-12 00:03:10: * 9.5 URIBL_OB_SURBL Contains an URL listed in the OB SURBL blocklist
Fri 2010-02-12 00:03:10: * [URIs: hilldid.com]
Fri 2010-02-12 00:03:10: * 8.0 URIBL_SC_SURBL Contains an URL listed in the SC SURBL blocklist
Fri 2010-02-12 00:03:10: * [URIs: hilldid.com]
Fri 2010-02-12 00:03:10: ---- End SpamAssassin results
Fri 2010-02-12 00:03:10: Spam Filter score/req: 45.60/5.0
Fri 2010-02-12 00:03:10: Message refused because spam score is too high
Fri 2010-02-12 00:03:10: --> 554 Sorry, message looks like SPAM to me
Fri 2010-02-12 00:03:10: <-- QUIT
Fri 2010-02-12 00:03:10: --> 221 See ya in cyberspace
Fri 2010-02-12 00:03:10: SMTP session terminated (Bytes in/out: 6121/566)
Fri 2010-02-12 00:03:10: ----------