Search This Blog

08 March 2010

Installing UFR II Printer Driver for Canon IR C3080

To install printer driver of printer Canon iR C3080 you have prepare CD Driver of UFR II. In this installation process I assume the printer machine is connected to switch or hub in your Local Area Netwrok with IP address 192.168.0.215.

Follow this setp:

  1. Insert CD ROM UFR II
  2. Explore CD-Rom using Windows Explorer
  3. Double click file MInst.exe
  4. Installation Windows will open
  5. Click on Installation button
  6. Installation option windows will appear
  7. Select the option you need to install then click Install button
  8. Installation process will begin.
  9. Window UFR II Setup Wizard will open

  10. Click on Next button
  11. Window License Agreement will open
  12. Click on Yes button
  13. On the next screen choose Search for Network Printer to Install and check on check box Reactive Printers in the Sleep Mode and Search
  14. Click Next button
  15. On the next screen chose Add Printers and then click Next button
  16. Installation wizard will reactive printers and search all connected printer on tour Network.
  17. After finding connected printer you chose printer you want to install on you PC and click on Add button

  18. Click on Next button
  19. Installation will create port for new printer
  20. Click Start on next screen to begin installation proses
  21. Click Yes on warning dialog box
  22. Wait a moment while installation process in progress
  23. Depend on installation option you chose on step 6, the next screen is for installing Network Scan Gear
  24. Click on Next button to install Network ScanGear
  25. Click on Yes button to agree Licence Agreemen
  26. On next screen you can chose destination location, if you don’t want to change anything just click on the Next button
  27. On the next screen you can select program folder, if you don’t want to change anything just click on the Next button
  28. Click Next button on Start Copying files
  29. Installation process will begin just wait a moment.
  30. Installation is Finished click on Finish button.
  31. The next step is to install Color Network Scan Gear
  32. Click on Next button
  33. Click on Yes button to agree License Agreement
  34. Click Next
  35. Click Next
  36. Click Next
  37. Installation progress please wait a moment
  38. Click Finish button
  39. Click Next
  40. Click Restart button if you want to restart your computer.

07 March 2010

Canon IR C3080 UFR II

Canon IR C3080 UFR II is the multi function printer suitable for user with more than one user. This machine can receive and send fax using telephone line.

For PC users, this machine can be use as printer to print color or black and white document. This machine also can be use as a scanner that will scan document to PDF, JPG or TIFF file format. If you need to scan document with small size file you can scan to PDF file format with black and white format.

This printer can be connected to switch/hub in your Local Area Network. After IP address of this machine setup you can admin the machine via web browser by opening the IP address of the machine using internet Explorer or other browser.

The first page display on browser is the top page and this page show the status of the printer machine.

1. Device Basic Information
In this part you can see the Device Name and Product Name of the printer.
Device Name: iR C3080
Product Name: iR 3080

2. Basic Function Status
There are three basic function of iR C3080
  • Printer status: ready or not ready
  • Scanner status: ready or not ready
  • Fax status: ready or not ready
3. Language
There are 6 choice languages: Japanese, English, French, Italian, German and Spanish.

06 March 2010

Activating Spam Filter on MDaemon Mail Server 9

MDaemon mail server support filtering spam process to block spam mail from internet. You can configure to enable or disable this setting.

To enable or disable spam filter process in MDaemon mail server follow these steps:
  1. Open MDaemon window application
  2. On the left side of MDaemon desktop application expand the sub tree servers.
  3. In the sub tree AntiSpam you can see status of AntiSpam; inactive or active
  4. Right click on sub tree AntiSpam and choose Toggle active/inactive to switch MDaemon spam filter enable and disable.

For the additional setup of Spam Filter you can go to Security > Spam Filter menu.
In the Spam Filter window you can setup processing to spam mail weather you would like to delete, bounce the message to the sender, put the message in the spam trap public folder or flag it but let it continue down delivery.

If you enable spam filter you can still make exclusion for some email address or part of email address or domain name. To do this you can go to Exclusion List and type the address you want to exclude by spam filtering process. Click Apply button to save and activate the changes you made.

05 March 2010

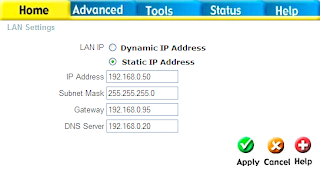
Change IP Address D-Link DWL-G700AP

How to Change IP Address of D-Link DWL-G700AP?

To change IP Address of D-Link DWL-G700AP Access point follows these steps:

  1. Login to your D-Link DWL-G700AP using Admin user.
  2. In Home page, click on LAN button.
  3. If your D-Link DWL-G700AP Access Point using Dynamic IP Address switch it into Static IP Address.
  4. Fill in IP Address you want to set up in your Access point. This IP address must be in the same class with your Local Area Network. For example if your network is 192.168.0.0/255.255.255.0 then the IP address must be in range of 192.168.0.1 to 192.168.0.254.
  5. Fill in appropriate subnet mask, gateway and DNS server for your LAN.
  6. Click on Apply button to save the new setup.

03 March 2010

Filtering computer to connect to DWL-G700

To improve security in your LAN, if you are using D-Link DWL-G700AP AirPlus G you can specify which computer or devices allow or deny connecting to your Access Point.

To do this setup you have to login to your D-Link DWL-G700AP using Admin user and then go to Advanced page, and then click on Filters button.

There are 3 options in this page:

1. Disabled MAC Filters.

This option means you allow all connection from any computers or devices.

2. Only allow MAC address(es) listed below to connect to DWL-G700AP.

This option means you only allow specified MAC address. After activating this option you have to entry MAC address of computers or other devices to be allowed to connect to this Access Point.


3. Only deny MAC address(es) listed below to connect to DWL-G700AP.

This option means you deny specified MAC address. After activating this option you have to entry MAC address of computers or other devices to be denied to connect to this Access Point.

After changing the options you have to click on Apply button to save the changes you have made. The D-Link will restart to apply the new setting for your access point.

01 March 2010

Installing Ironport C160

Since the number of incoming spam messages to a user in our office, we decided to use a special anti-spam, because the existing anti-spam on Mdaemon not able to detect and block incoming spam.

Ironport C160 becomes our choice as the anti-spam that is used. The installation process is assisted by technical support from the supplier that is Metrodata. It did not take long to install Ironport in our office. On the first day of Staff Metrodata install Ironport while the second day of transferring basic knowledge of how to monitor email tracking, especially email messages coming into our office and how to create a rule-Content filters for additional rules that can be customized by our own.

The result is very good spam filter; almost all spam can be blocked so that spam emails do not enter to user inbox. All spam is quarantined by the Ironport for backup if there are occasional important emails is required that is not spam but blocked by the Ironport.

I tried making my own artificial filter content. Content filter that I made was to block and quarantine incoming email from yahoogroups mailing list for employees who have not worked in our office. Employees who are out are not doing unsubscribe to the mailing list so that email from yahoogroups still sent to the user.

Benefits of using Ironport:
  1. Nearly 100% of the spam emails were blocked so that spam does not enter to user inbox.
  2. Reduce spam email traffic so that bandwidth LAN traffic decreased due to spam.
  3. Users to work more effectively because it does not deal with spam.
  4. User's Inbox folder is more efficient because it does not store spam.
  5. Web interface for monitoring emails on the Ironport is very easy to use.
  6. There are charts that facilitate monitoring of email receipt.
  7. Message tracking was recorded in the log is complete.